Ok, winter has officially arrived. It's been cold lately but that hasn't stopped me from riding to work ... Shit, last week I rode in -15 Celcius; you just have to dress for it. However, with small amounts of snow falling for the last 4 days in a row, we've now got about 15 cm on the ground. Combined with the salt on the roads, my riding is basically done for a while.
Now I just need to get the bike to the heated self-storage unit I've rented. I'll have to wait for a clear day. I hope to get to work on the RMZ fork swap, and I'll need to order a few things like a Vapor speedo unit, headlight mounting brackets, etc,. Planning a few other upgrades, too: Pingle petcock, luggage side-racks, RaceTech valving for the rear shock, etc,.
It's no secret the stock DR650 suspension --both front and rear-- is comprised of pretty low budget components. Last winter I bought some stiffer fork springs: Eibach .50 Kg/mm straight rate (stock springs are progressive .43 Kg/mm). That $100 upgrade helped to tighten things up a little, along with fresh 10W fork oil. However, there was still no compression or rebound damping adjustment, because the DR's forks are old-school, old-tech, el-cheapo damper rod forks. Suzuki was so cheap they didn't even provide preload adjusters on the fork caps, so even setting sag height required removing the caps and using a shorter or longer spacer... how convenient!
Anyway, after trail riding all year I've been toying with the idea of installing Race Tech's cartridge emulator valves, but they're a lot of work to install, and making adjustments to them once they're in place is way too much effort. Plus there's the $200 cost.
I also considered Ricor-Racing Intiminators. They're a little "gimickey" if you ask me. And I did purchase them for my last bike, the '07 SV650S... at first I thought they were great but after a few weeks of riding on them the novelty wore off and I wished I had just done the popular GSXR from end swap that all the cool SV riders do. They're pretty simple to install, but again, there's no adjustment. That's another $200 I didn't want to spend.
So I've been keeping my eyes peeled for a deal on a set of RMZ forks. After having read the details of a few folks at ADVRider who have done the swap, it's pretty much a bolt-on solution because it doesn't require any custom machining. Lots of other forks can be adapted but it usually involves pressing out the steering stem, machining the triple clamps, or other fabrication work. The RMZ is comparatively easy, much like a paint-by-numbers project. And RMZ forks are plentiful on eBay but prices are high for the ones worth buying. Cheaper ones are usually worn out, or being sold separately from the triple clamps, etc. Then I happened to run across an ad at ThumperTalk for a complete 2007 RMZ250 that was being parted out because the engine had grenaded and was going to be too costly to repair. The ad was nearly 3 weeks old and I figured the forks would be long gone. To my suprise, the seller replied indicating the entire front end was still available, even the entire front wheel assembly. And it's all in top shapre mechanically and cosmetically... The price was $500 for all of it, and he lives barely 1.5 hours away. Holy shit, this is exactly what I've been looking for.
So today I drove down there and grabbed it all. I could have re-used my DR wheel and larger brake rotor, but that would involve changing out the wheel bearings. This wheel is in perfect condition so I couldn't pass it up. I've got the complete front end, in its entirety.
I will also need to do something with the rear suspension. I've already done the rear spring (a heavier Eibach 7.8 Kg/mm). That helped a bit, but I wish there were some way to adjust rebound damping (there is a compression damping adjuster). I may send it away to Cogent Dynamics to have it re-valved and a rebound damper adjustment added. I may also just buy a Race Tech kit and install that myself. Decisions, decisions.
I've read all kinds of great things about GoPro's Hero cameras and I finally decided to get my own. In the short time I've had my Hero, I gotta say I'm a little disappointed. First, I'll explain a bit about the camera, then I'll get to my opinion.
I purchased my GoPro HD Hero 960 video camera from PointOfViewCameras online store. The 960 is a new model, essentially the same as the latest, greatest HD Hero 1080 model, but with a few features missing. This makes it about a hundred bucks cheaper. The video recording resolution is the main difference between them:
The expensive HD Hero 1080 can record in these modes:
1080p: 1920x1080 pixels, 30 fps, 12 Mbit/s data rate
960p: 1280x960 pixels, 30 fps, 10 Mbit/s data rate
720p: 1280x720 pixels, 30 fps, 7.5 Mbit/s data rate
720p: 1280x720 pixels, 60 fps, 15 Mbit/s data rate
while the cheaper HD Hero 960 records in these modes:
960p: 1280x960 pixels, 30 fps, 10 Mbit/s data rate
720p: 1280x720 pixels, 30 fps, 7.5 Mbit/s data rate
WVGA: 848x480 pixels, 60 fps, 8 Mbit/s data rate
When comparing the 1080 model alongside the 960, they share the same wide angle lens (170 degree viewing angle), the same rechargeable lithium-ion battery, the same 5 MegaPixel still photos, yada, yada, yada. The 1080 model also has support for some yet-to-be-released accessories from GoPro that will clamp onto the back of the camera via the battery access door, including an LCD panel to show you what your recording and to review photos and videos, and an auxiliary battery pack. Basically, the 960 won't support these non-existent accessories.
I paid $179 plus the standard 13% taxes for the camera, and that included free ground shipping, which took about a week from Vancouver to Ottawa. Also included was a bonus 4GB SD memory card. It came with the standard selection of mounts. See photo:
I'm rather disappointed with the mounts... that's one of the things people always rave about when it comes to GoPro cameras: the mounting options are supposed to be endless. Well, there maybe countless ways to mount the camera using the plastic parts supplied, but the mounts basically suck ass, in a really big way. They feel cheap and flimsy, you can't screw the little plastic knobs tight enough with your fingers to actually hold the camera securely (when mounted on the bike, my thumper's vibrations shake the damn camera all over the place, and if I loft the front tire in the air, the camera shakes violently upon landing).
With the sticky 3M two-way tape on the two supplied "adhesive mounts" you get only one chance. Stick them and leave them... they can't be moved again. I stuck the curved mount on the side of my gas tank but it vibrates all to Hell in that location. I would have stuck it on my helmet but I couldn't get it to fit the contour of my Shoei Hornet DS properly but I found the shape of my IMS gas tank to be quite close to the contour of the curved mount. So after having wasted the curved mount, I decided to think harder before wasting the flat adhesive mount and came up with this:
RAM mount for camcorder or camera.
I stuck the flat adhesive mount to a round camera RAM mount, and for added security, I ran a bead of silicone around the outside edge. I thought this mount would be the most secure... I clamped it onto the RAM ball mount I have on my handle bars (which I normally use for my Garmin Oregon GPS) but still, the damn camera vibrates all over the place. I'm not afraid of it falling off, it just annoys me to no end when I see the video shaking during play back.
I even spent another $20 on my order to get a GoPro's own handle bar / seat post clamp mount... This cheap piece of crap is probably only worth $2 but some how they sell it for $20. Again, it's cheap, flimsy plastic and it doesn't hold tight enough to handle the rough treatment it receives on the handlebars of a big thumper. A mountain bike maybe, but it can't take the vibes from my bike.
I have yet to try the head strap mount but I see no point. It's not meant to be worn over a motorcycle helmet so I really have no use for it.
I have looked at the chest mount strap but at $50 I'm not about to get suckered into that. I've thrown good money after bad on other things before and I've learned my lesson. Remember that saying: "quit while you're ahead."
On the positive side, the quality of the video is respectable. Not awesome, but not bad.
Here's a sample. The higher the engine revs, the worse the camera shows the vibrations. This is using the $20 GoPro handlebar mount.
And here's a sample of the camera secured to the
handlebars with my RAM mount
Conclusion: While the camera itself seems to be a reasonable piece of gear for under $200, it's not worth shit if I can't figure out a way to mount it securely to my motorcycle. I've basically come up with 3 possible solutions:
1) dream up a mount that uses a rubber vibration damper (some type of rubber mount where it bolts/clamps onto the bike);
2) mount the camera on myself somehow because my body doesn't vibrate as much as the bike (I'm trying to buy another curved adhesive mount to try again on my other helmet but I'm not going to by a big bag of mounts). However, I'm really not interested in wearing the camera on my body or on my helmet -- I bought it to mount on my motorcycle;
3) sell the damn thing on eBay and find another camera solution.
Oh, before anyone asks if I used that silicone swimmer's nose-plug thing-a-ma-jig in the mount base, yes, I did. That thing isn't designed to absorb all the vibrations, rather, it's meant to stop the camera from wobbling around loosely in its mount. The problem I've seen is an issue that stems from the massive engine vibrations that big, single-cylinder thumpers are known for. If my bike had a sewing-machine-smooth inline-4 engine, then my impression of this camera would probably be very different.
Dave had a few days off in the middle of the week, and I figured I was due for a sick day. So we loaded the bikes onto my newly-made trailer and we headed towards Pakenham. It was a slow start in the morning and we didn't hit the trails until noon, but it was a nice sunny day. Couldn't have asked for nicer weather for this time of year. Still some snow in the woods from the 3-4 inches that fell last weekend, and some of the puddles were covered with ice, but it was perfect riding weather.
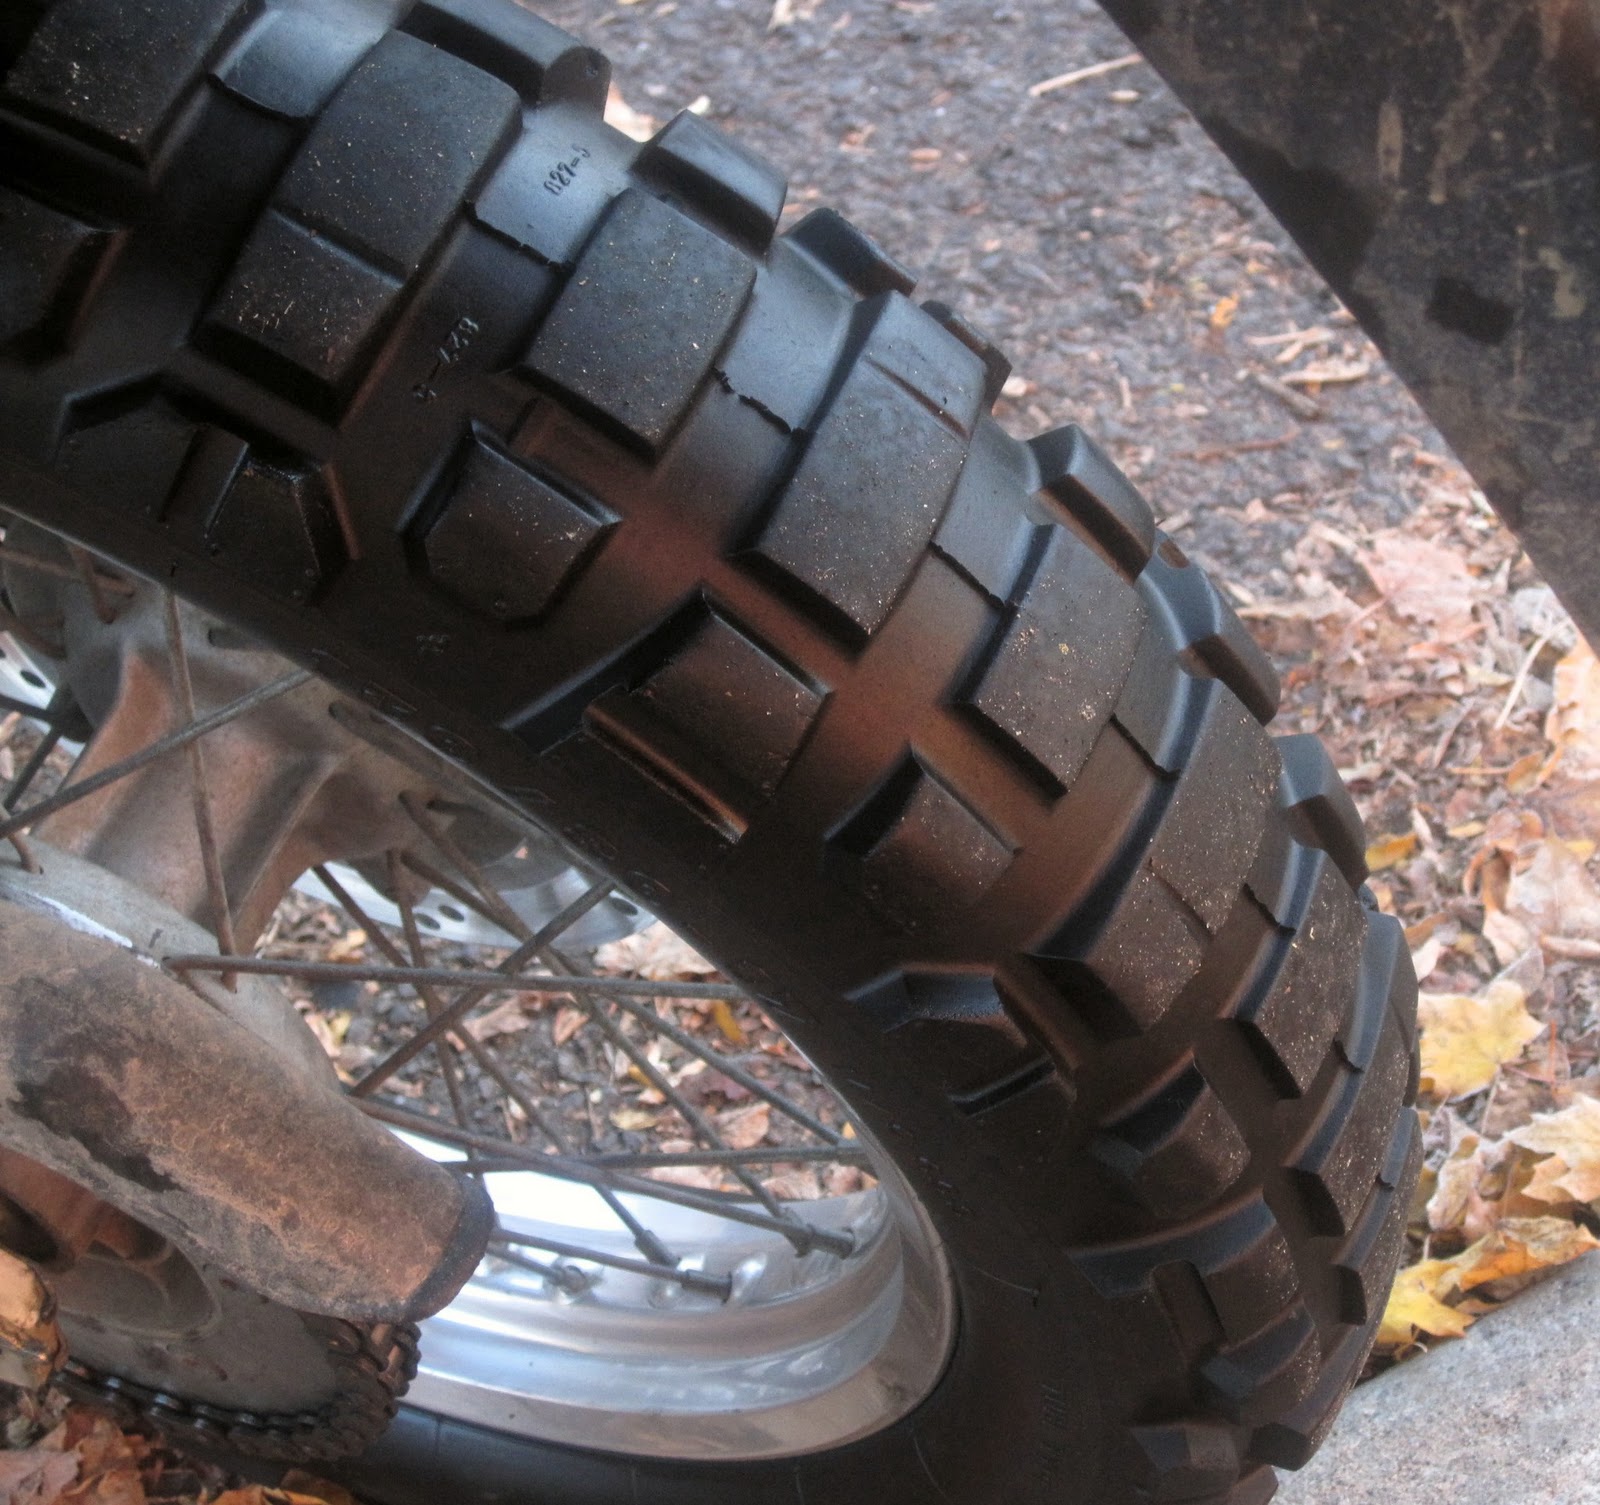
OK, here's an update on my favourite tires. With just under 5,000 Kms on them, these are the best value I've ever had for $55 a piece.
I removed the screw from the rear tire and replaced the tube. Yes, it's worn now, but there are still one or two-thousand Kms left, and the front tire is barely 1/2 worn.
Brand new Michelin T63
Tread depth 10mm.
after 1,750 Kms
after 2,500 Kms
after 4,800 Kms.
Tread depth is about 5-6mm.
When I re-installed the tire following Monday's flat, I flipped the tire so that the slanted wear of the knobs are now facing the other way. This will help to even out the knobs during the last miles left in this great tire. I hoping the real winter snow and cold will hold off to allow me a few more weeks of commuting. If I can make it 'till Christmas then I'll toss this tire and mount a new one. I expect to have about 6,000 Kms on it by then.
Very pleased with this tire given the price tag. I've abused it to no end on the street, accelerating hard all the time, wheelies every chance I get on city streets. Not a nice way to treat a knobby.
Well, I got to try out my trailer today after all...
Rode to work. At lunch, I was going to zip home and discovered my rear tire was flat. So, I stayed around the office for lunch and asked a few people until I found a mini bicycle pump to borrow from a co-worker (thanks, Grant). At quitting time, I managed to pump it up to ~25 psi after about 8 million pumps. My arm was ready to fall off. I headed for home immediately, and planned to stop at a service station with a real air compressor pump just in case. By the time I got there (about 2 Kms) the tire was nearly flat. I pumped it up to about 30 psi and rode about another 1.5 Kms before it was completely flat. At that point I was running out of time because I was on my way to meet my kids' school bus. I parked it on a quiet side street and quickly flagged down a taxi. Made it to the school bus stop just in time.
A short while later, I packed the kids into the van and hooked up the trailer. Brought the bike home and pulled the rear tire off. I've got a new Michelin T63 in the basement, plus a new heavy duty tube. I'll tackle that tomorrow evening because now I'm having a beer.
Loaded on the trailer. A little tricky when you're doing it alone.
Was supposed to go riding with Dave today. Yesterday was pretty soggy so we decided to plan for a Sunday ride instead because the forecast looked a little better. However, last evening the rain changed to snow and we got a couple of inches. By morning, it was beginning to melt, but it was barely a degree above freezing. With all of yesterday's rain, and the wet snow on the ground this morning, we abandoned our plan.
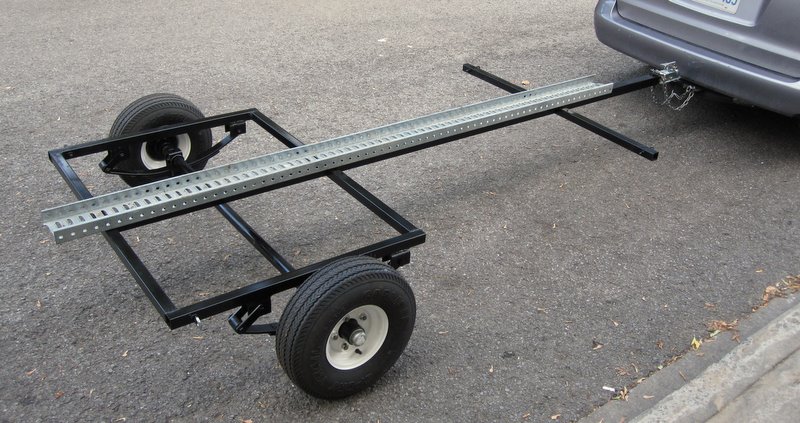
Our plan was to test out my new trailer and haul the bikes to Calabogie. Although it rained all day yesterday, I did bolt down the two tire tracks to the frame of the trailer. These are actually galvanized steel commercial cable tray (the kind of rack used to support data, voice, and electrical wiring in commercial buildings -- it's suspended from the ceiling and cabling lies in the rack). I bought it from a local recycler for about $12-$20 each. I bought one narrow section (4.5" wide) and a wide one (7.5"). Quite sturdy.
This is what the weather was like at 9pm Saturday evening.
By noon on Sunday, the snow had melted off the road and the asphalt was beginning to dry up.
Hopefully Dave and I will have another opportunity to ride a few trails before winter really hits. Fingers crossed.
In search of better ergonomics, I scoured the Interweb to explore my options. I got rid of the OEM handlebars long ago, and I've been using Renthal CR high bend bars, made a little higher with a 6 fat washers loaded under the bar clamps (and longer bolts). It was an improvement, but I couldn't help but feel the handlebars needed to be moved forward (not just higher). I was also interested in getting rid of the cross-bar. Riding on the road, comfort was fine. Rather, the improvement I was hoping to achieve was for those times I am standing on the pegs wrestling the bike over rocky trails. I especially noticed this on steep uphill climbs.
So, after much research I placed an order from RockyMountainATV for a pair of 2" Rox Risers and a set of YZ bend Tusk Chub Big Bars 1 1/8" fat bars. It was about $125 for both items. I ordered the Rox Risers that clamp into my existing 7/8" bar clamps, but they have 1 1/8" mounts for fat bars. Going to fat bars would achieve my goal of eliminating the cross bar that is standard on 7/8" aluminum bars.
The Rox Risers allow for plenty of adjustability. You can pivot these suckers at any angle you like in the stock bar clamps. Before mounting them, I removed my ghetto risers (the fat washers), and re-installed the original bolts.
I installed the Rox Risers in quite a forward position, then I mounted the new Tusk fat bars. Feels nice. And standing on the pegs, I don't feel like I'm fighting against my own bodyweight when climbing treacherous rocky hills.
In order to fit the Moose Racing Contour aluminum handguards I've been using with the old 7/8" Renthal bars, I had to order Moose clamps to fit fat bars. Reluctantly, I did so from my local dealer. At $50...just for the inner clamps! I think I paid $60 for the handguard set which included the guards, plastic deflectors, and the 7/8" clamps. Oh well. It's done and my handguards are now mounted.
These fat bars are nice and wide at 31.6". The stock bars are about 29.5" and the Renthals I've been using are about 30.5". The new fat bars feel nice riding around town, and riding off-road the steering feels light. Better control for sure. The YZ bend is pretty flat and low compared to the CR or KX bends. I was afraid of going too high since the Rox Risers add 2", plus the YZ bars don't have too much pull-back,
RockyMountainATV had a good reference guide on their site. Here's the low down:
With the number of nice, sunny Saturdays dwindling, Dave and I decided to go for a ride today. The peak of the fall colours is now over, but it's still quite pretty. We started with day at Starbucks, then we headed to our usual riding area, in the direction of Lanark County and Calabogie. Great day of easy double-track, trails, some rocky power lines. With all the rain from the last 2 days, conditions were pretty wet and we saw some mud. That just made the ride more fun.
Not sure what this is about. This is where the trail begins, on Concession Rd #9 just past Almonte.
Pine forest
Found a nice wide double-track off California Rd, but it led to a dead end after a couple of miles (a chain gate across the path -- private property).
I've been watching my rear brake pads getting thinner for the past year, and so, I decided I should finally change them before the metal-on-metal grinding begins. I could have changed them sooner, as the previous owner of my DR included a new set of brake pads when I bought the bike. The new pads have just been lying around in my tickle trunk down in the basement. I just figured I should try to get as much mileage as I can before tossing them. So, with 22,090 Kms on the odometer, the original pads are pretty much worn down to almost nothing. I'm sure it would have only been another week or so before the brake rotor would be scored.
I'll have to do the front ones soon, but the originals still have a few miles left.
Sean and I are planning one last road trip together for this season. Like the last time, we're going to meet 1/2 way, near Bancroft. We'll camp there and do 2 or 3 separate day trips. And like every other trip I've done, I still feel like my Givi E370 topcase is a little small for anything longer than a weekend trip. So, today I decided to rig up my own luggage solution -- on the cheap, naturally.
Went to a local scrap yard and found a heavy duty piece of 3/16" aluminium. It measures about 11" x 15" and it has a bend with an inch wide flap running along the long edge. I bought it for $5 and I used a jigsaw to round off the 4 corners. Then I clamped it tightly on top of the Suzuki OEM luggage rack. Using a centre punch, I lined up 3 holes so I could run bolts through the plate and directly through the steel tubing frame of the OEM rack. Some stainless steel bolts with nylon locking nuts hold it in place very securely.
It provides a stable platform for the new 46-Litre "Marine Duffle" I bought from Lebaron (local outdoor sports shop). It's quite rugged and it has a rigid foam tray moulded into the base of the duffle bag. The zippers are quite robust and they are covered by a thick flap so it should do OK in the rain. At least I'll be able to carry a little more than the Givi box.
And how about a tire wear update? Well, the Michelin T63 is definitely my new favourite tire, replacing the Continental TCK-80. So far, I've got 2,500 Kms on the rear, and a little over 1,000 Kms on the front. The rear still looks great, with over 8mm of tread depth remaining (10 mm when it was new). The front still looks brand new, and my tread depth guage doesn't show any measurable wear. They are definitely noisier than the Conti TCK's on the street, but in the dirt and mud they grip a little better. I still can't believe they only cost $55 each !!!
Didn't get any riding in this weekend, but I did get some maintenance done. First up was to check the valve clearances. The service manual says the intake valves should be betweek .006" - .008", and the exhaust valves should have a gap of .003" - .005".
Both intakes were a little on the loose side: my .008" feeler guage was able to slide in and out quite loosely. The trick I use to set them properly is to set the adjusters so that the .008" guage is tight. That way, the .007" guage fits nicely -- not too loose, not too snug. This ensures that you end up with an adjustment that's well within spec.
My exhaust valves were spot on and didn't require any adjustment. My .005" guage was a snug fit, and .004" fit perfectly.
Next it was on to the engine oil. It had been about 2,600 Kms since the last fresh jug of Rotella T 10W40. I still have a bunch of Hi-Flo Filtro oil filters since the box of 10 I purchased in the spring from ProCycle. This was also my first change since installing the Pat Walsh skid plate. It's a breeze because it has a hole for easy access to the engine oil drain bolt. Unlike that road sign skid plate I had been using, which required removal to access the drain plug.
Like a dumbass, though, I overfilled it by a little and had to take some out (that's the problem when pouring from a 1-gallon jug: it's hard to determine how much you're pouring. Oh, well. Not a big deal since I always go for a quick ride and check the oil level after an oil change.
I even gave the bike a quick wash -- because she deserves it once in a while
I also spent a couple of hours working on the trailer this weekend. I welded on the anchor support arms at the front, and drilled and bolted eye hooks at the the 4 corners, attached a safety chain and the hitch coupler, and finally I painted the whole thing using Tremclad Professional quick dry gloss black rattle can paint. I have a set of magnetic trailer lights that are super convenient to use. Just plug-em into the car and use the magnetic base on the lights to stick them where you need them. Not quite finished yet, but getting there.
I even used the trailer for a quick trip to the lumber yard to pick up some more cedar so I can finish the deck I've been slowly building all summer.
I recently picked up a decent handheld mapping GPS, an invaulable tool for trail riding. While I have a full-featured Garmin Nuvi 760 for the car, and have used it many times on the bike, it's really only useful for street navigation.
So, after much research and lots of online bargain hunting, I ended up with the Garmin Oregon 300 GPS. It comes pre-loaded with a basic worldwide basemap, and I've added Garmin's Topo Canada V4.0 map, cGPSMapper Southern Ontario Enhanced Basemap (free map from http://gpsmapsearch.com/ using this map). I also picked up a 16GB Kingston MicroSD memory card (overkill, yes, but it was only $25), and I even wasted 30 bucks for a subscription to Garmin's Bird'sEye Satellite Immagery web download service (not worth the cash, in my opinion).
Garmin Oregon 300
The Oregon 300's main features include touch screen (3" diagonal), high sensitivity WAAS-enabled GPS receiver (it's accurate to within about 10 feet), electronic compass, barometric altimeter, microSD memory card slot, wireless sharing of your data (waypoints, tracks, routes and geocaches) with other Oregon units. It's also waterproof, which is a very important feature.
I've not had any trouble using the touch screen while wearing my gloves, although it seems to respond a little better when I remove my gloves. So far, I'm really liking this GPS. I bought it at Walmart for $299 (Canada).
screenshot
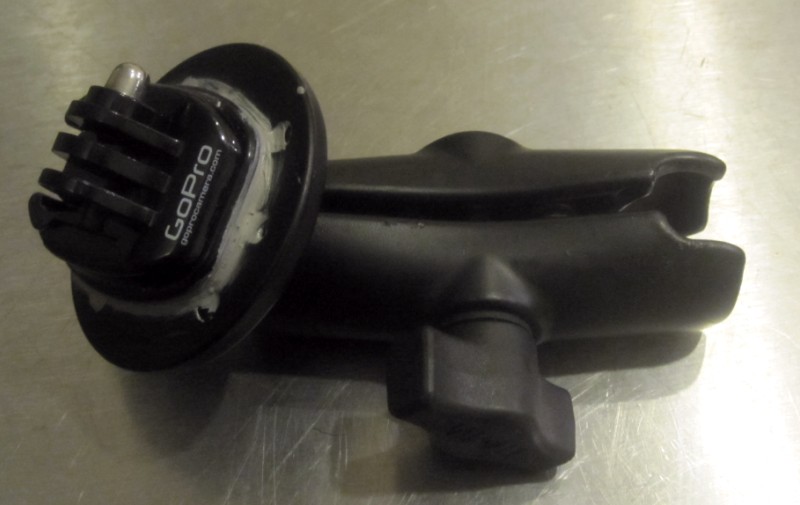
I bought a RAM mount system from GPSCity through Amazon for $30. The only way to really mount this thing on the bike. Garmin sells a handlebar mount that attaches with zip ties, but it looked pretty crappy compared to this RAM solution.
To power this new GPS, I've been using low self-discharge Sony CycleEnergy hybrid Ni-MH AA batteries. I went to the Sony Store at the mall and bought a kit that includes a charger and four AA cells for $60 -- yikes! The charger has a "refresh" button that will drain the batteries fully first, and then charge them, if you so wish. The advantage offered by newer hybrid types is that they retain their charge for a much longer period when not in use. Older Ni-Mh batteries would lose ~ 1/2 their charge if they weren't used for 30 days. These particular Sony's perform very well when powering electronic devices. Although they don't have the same initial punch as some higher capacity 2700 mAh batteries, they do perform very well and actually last longer overall -- many high capacity rechargeable batteries provide more initial power, but only for a short time, meaning they start to run out of steam quicker. These Sony's provide a good balance of overall lasting power, and they claim to retain 90% of their capacity while in storage for a year. So far, my experience with these batteries is very positive. They have performed much better than many other rechargeables I have used before: I've tried the Energizer AA's and they suck, and Duracell rechargeables are OK, but not nearly as good.
I have some smaller AAA Sanyo Eneloops (also hybrid) and I would have bought some in AA size but I wasn't able to find them locally, I've also used the as these Sony's.
I have also used the mini-USB cable to power the GPS while on the bike using my 12V cigarette lighter plug USB adapter. It works well but I'm worried the extreme vibration from my big thumper might eventually loosen the USB port connnection on the GPS. Besides, these new Sony batteries are easily lasting a full 8-hour day of riding, and I keep a spare set fully charged in my pocket just in case.