Wednesday, March 31, 2010

LED lighting

I'm a big fan of LED lighting, but only if they're as bright (or brighter) than OEM filament light bulbs. The fact that they don't give off heat, they power on/off instantly, they last for 100,000 hours, and they consume far less power than conventional lighting...these are all very worthwhile benefits.

You can buy all kinds of LED lighting from any number of places on the InterWeb, inlcuding eBay, but not all LED lights are created equal. Many of the cheap ones are just plain junk: not bright, not well made, etc.  I've purchased from SuperBrightLEDs.com in the past and their products are exactly as they describe. They may not be the cheapest, but their pricing is reasonable. And they offer very cheap shipping ($5 for my entire order, shipped from the US to Canada). And the best part about this store is that if they say they're bright, then in my experience, it's been true. Not the case with some of the crap LEDs I've bought on eBay.

Here's a list of the items I purchased


Now I wanted to try both types of 1157 tail/brake lights -- the high power 18 SMD LED tower, and the 24-LED wide angle cluster (these appear as the 2nd and 7th items on the invoice list above). I knew the high-power 18-LED was very bright because I had one before when I was running the DRZ tail light, but it got ruined after water and road salt got inside the tail light assembly and rusted out the bayonet base of the socket...however, I wanted to compare with the rear-facing 24 LED cluster to see how it would perform. As I expected, the 24-LED cluster isn't as bright...probably because it isn't called "high power" in the name. Bright, but not quite as bright.


 1157 RED 24-LED wide angle cluster

1157 RED high power 18 SMD LED tower


 24-LED wide angle cluster - tail light on

 24-LED wide angle cluster
**tail light
** about as bright as the OEM filament bulb

 24-LED wide angle cluster
**brake light
** hard to tell, but the brake light is slightly
less bright than the OEM filament bulb


and now, the high power 18 SMD LED tower
** tail light only

high power 18 SMD LED tower
**tail light only
**a little brighter than the OEM filament bulb

high power 18 SMD LED tower
**brake light
*** hands down winner for brightness

As I mentioned above, I used to have one of those high power 18 LED bulbs before it got ruined by moisture and salt. Now I've gone back to using the original tail/brake light housing and hopefully it won't leak.

Stay tuned for more LED lighting. You'll notice on the invoice above I also purchased an H4 bulb (just for fun) and some tiny wedge base LEDs for the instrumentation lighting (speedo, neutral, high beam indicator, turn signal indicators).

Oh, while I'm at it, I don't think I ever posted information about my LED turn signals... I didn't care much for the big, bulky OEM turn signals, especially on the rear because every time I would swing my leg over the seat getting on or off the bike, I'd kick the turn signals. So, I found a solution to de-clutter the rear blinkers:

a pair of billet aluminum high power LED turn signals designed to fit in the front fairing of a Suzuki V-Strom. They're made by Watsen Designs. They came with a diode soldered inline, and Suzuki turn signal connectors. How plug-and-play is that?? They're expensive, yes... but extremely well crafted pieces of art. I drilled out the mounting holes on my Suzuki accessory luggage rack and bolted them on. I did snip the wires and lengthen them to reach the connectors under the seat. It wasn't a big deal.


Watsen Design billet LED blinkers for V-Strom


They're tiny, but they're so bright 
they'll burn your retina if you look 
directly into the light.

Thursday, March 18, 2010

Valve adjustment and TM-40 carburetor tuning

I'm off work this week minding the kids while they're on March break. While they were busy riding their bicycles with the all the neighbourhood brats, I took some time to tinker with the bike.

When I had the engine all apart over the winter, I had intended to check the valve clearances, however, I wasn't able to locate my feeler gauges at the time. As Murphy's Law would dictate, I only managed to find the gauge set after I finished buttoning up the entire engine. Anyway, today was a  nice day so I decided it was time to get it done. Of the two intake and two exhaust valves, only one intake was out of spec -- and not by much.

Since that didn't take too long, I wanted to make another little change to my new TM-40 carburetor. It's a great carb -- way better than the factory CV unit (although I did have that one set up and running quite well with the intake system mods and DynoJet kit). Anyway, the new TM-40 was working great but it seemed a little rich in the first 1/2 throttle. The spark plugs and muffler outlet pipe were also a little black and coated with soot. After having swapped the pilot jet for a size smaller (from a size 22.5 to a 20) and fiddled around with the pilot air/fuel mixture screw last week, it seemed to help in some ways but it wasn't perfect: it seemed less responsive than it should. With the smaller pilot jet, the spark plugs looked a little lean (white) on the electrode, yet sooty on the outside edges of the plug, near the threads.

So, with the gas tank, seat, and side covers removed for the valve adjustment, I swapped back to the original pilot jet, and moved the needle clip up one notch (from the 3rd clip position to the 2nd). This effectively lowers the needle into the needle jet down inside the bowl, leaning the mixture but only in the 1/4-1/2 throttle range opening. From there, I turned the pilot screw in about 1/2 a turn to lean out the idle mixture.

After a good hard ride around the city, plus a few Kilometres on the highway, it now pulls hard right off idle to wide open throttle. It's also very responsive. That seemed to be the missing link. After cruising a Km or two in 3rd gear with it revving pretty good (around 85Km/hr) I pulled over on the side of the road and quickly removed a spark plug to check. A nice even tan brown colour. Awesome.

I expect that fuel economy will improve due to the needle adjustment, although I haven't been keeping track of it while I iron out the little bugs. With the BST carb, I was averaging 150 Km of  hard riding in the city for roughly 10 Litres of fuel. That's roughly 35 mpg -- not so great, but I hammer it pretty hard most of the time. I'm curious to find out if that will change.

Sunday, March 14, 2010

New project: restoring a 1993 Suzuki JR50

I bought a bike for the kids last fall. Yes, it needs some TLC, but it's actually in pretty good condition overall. It's a 1993 Suzuki JR50 and I think I paid $250 for it. It also came with a bag of new parts (chain, front sprocket, rear tube, air filter, gasket kit). Over the winter, I spent about $50 for new tires, a tube, and a spoke kit.

So far, the carburetor has had a thorough cleaning inside and out. I've replaced the tires and tubes, and gave the wheels a real good scrubbing, and replaced a bunch of broken/missing spokes in the rear wheel.

I'm planning to repaint all the plastics, yank the engine out of the frame and give the casings a fresh coat of paint, along with the exhaust system.

The rear brake shoes look to be worn enough that I will probably order some new ones.


As purchased for $250 in October 2009

disassembly has begun


Wednesday, March 10, 2010

Continental Twinduro tires

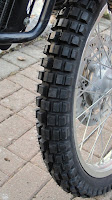
I spooned my new tires on... recently picked up a pair of Continental Twinduros (TCK-80) tires for relatively cheap ($190 US, compared to more than $600 CDN from a local dealer). As much as I love the Avon Distanzias for their performance on the asphalt (and especially in the rain), I do intend to venture a little further off the beaten path this year, so some better off-roading tires were in order. The Avons still have a lot of tread left on them, and I intend to keep them for a upcoming roadtrip to Cape Breton this summer. Since installing them last summer, I've put about 5,000Kms on them and they still look like new. I don't expect the Twinduros will last as long, especially with my commute to work.

 
front Distanzia                               front Twinduro


rear Distanzia                              rear Twinduro


In fact, I also picked up a first generation SV650 front wheel ('99-'02) which is supposed to be a pretty painless su-mo wheel conversion. I took the 130/80-17 from the rear of the bike, and spooned it onto the SV front wheel. It's pretty fat for a cast sportbike wheel, but I think it looks cool. I've seen a few other DR650's on the Interweb with two rear Distanzias and it apparently handles pretty well. We'll see. Now I just need to figure out an extra rear wheel option (I'll keep my eyes open for an extra DR650 OEM rear wheel and just get myself an extra rear Distanzia for it. Having an extra set of tires mounted on wheels will make switching from dirt to street much less painful.


rear 130/80-17 Distanzia mounted on a front '99-'02 wheel 
(yes, I know the rotors are mounted backwards, it was so 
that they wouldn't get damaged during shipping, and one 
rotor will be removed for use on the DR)


And here's my ghetto bead-breaking technique... works pretty well but still requires a little muscle.


odo: 13,450

Monday, March 8, 2010

weekend riding and farkling

For the beginning of March, we're having some great weather. I don't want to say that spring has arrived because it might just turn around and bite me in the ass with a big snowstorm. Anyway, I went for an afternoon ride with a buddy from work who was itching to get back on two wheels. He rides a CBR600RR. We cruised all over town and stopped at a couple of motorcycle dealers just to look around. Weather was nice and sunny. The roads still have plenty of sand in the intersections so you need to be careful, especially on a sportbike.


And for no reason other than to spend a few dollars, I bought the old pre-2002 DR650 headlight fairing. It fits exactly the same as the 2002 and newer fairing, and I just like the look of the old one better. Found a guy selling it on ThumperTalk for cheap and I have some cash sitting in my PayPal account from some leftover SV650 parts I peddled on eBay.

 
I like this one better.

Thursday, March 4, 2010

It's alive !!!

Winter bites...it's been a little over 2 months now since I last rode the bike. While we got off with a relatively painless and short winter this year, I'm quite eager to get back on the road.

A leaky base gasket was the main reason for the tear down. I took my time over the last 8 weeks or so, disassembling, checking everything for wear, etc. In the end, it went back together with just a really good cleaning, new gaskets and new piston rings.

It's basically back together now, with just a few final things left to bolt on. I'm always nervous about having mounted the timing chain off by one tooth on the cam gear, and plus I really just wanted to know the engine was actually going to start. I'm very eager to try out this new Mikuni TM-40 pumper carburetor, too.

I would have had it running a couple hours sooner, but I lost a tiny rubber o-ring for one of the oil cooler line and had to run all over town to locate one. Finally found a petroleum-resistant o-ring of the correct size local auto store.

Sure felt great to hear it fire up almost instantly. Have a listen:


Because she fired up right away, I'm now very eager to finish it up and go for a spin. The weather forecast is looking good for the next few days...I might have to call in sick Friday and go riding.

odo: 13,250

Monday, March 1, 2010

Montreal Motorcycle Show

Just got back from the 2010 Montreal Motorcycle Show -- went with a friend from work. Spent Saturday afternoon & evening checking out the bikes, then we feasted like pigs:  BBQ chicken, ribs, and beer. Spent the night at a swanky hotel just 2 blocks from the big show.


Expensive Italian machinery


Kawi Z1000

H-D flat track racer

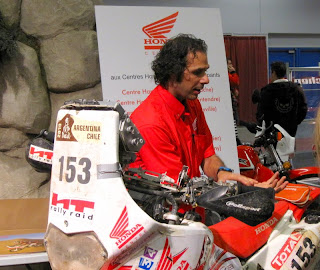
Patrick Trahan - competed in the 2010 Dakar Rally


CBR125 racer

Aprillia - the other Italian

Checking out the new Thruxton

Yamaha WR250X

KZ13000 (inline 6-cylinder)

Kawasaki Z1 

The original 1970's widow-maker
(museum quality restoration)

The 21st century widow-maker

Boulevard M109


Boulevard M90


ZX-14-powered T-Rex